Table of Contents
Documentation
Welcome and thankyou for your interest in TekaPoint.
This documentation should answer all your questions about how to get started using TekaPoint. With practice you will be able to amaze your audience with your presentations skills.
Checkout the Matrix page for a drawing cheat sheet.
If you still have questions see the Support page.Introduction
At the beginning of the 2020 pandemic, the need for remote online presentations grew.
Drawing diagrams is as important in remote sessions as it is in a boardroom, classroom, or auditorium. A clean, precise picture can get the point across with ease.
The problem is, when presenting in a remote session using a desktop or laptop computer, you have lost your typical drawing tools such as a whiteboard or projector systems.
You can use tablets or drawing devices in both modes of delivery, however switching from using a mouse to a drawing device adds a disruption in the middle of a narrative.
Not only is moving to a drawing device disruptive, it also adds a hurdle to micro additions to the screen. Continuous visual stimulation can help to control the audience and keep their focus on the relevant content capturing their attention.
TekaPoint is a solution to enhancing presentations in both online delivery and live sessions.
After getting a copy of TekaPoint and setting it up to launch using a global keyboard shortcut, it becomes simple to switch from interacting with the desktop or presentation using a mouse, to high-lighting content with a variety of attractive lines, shapes, and artifacts.
If a question from the audience requires a complex answer, TekaPoint can be used to produce diagrams with extensive content. All this whilst only using a keyboard and mouse!
See the TekaPoint homepage for short videos showing the features of this innovative presentation tool.
Go to the homepage and enter the amount you would like to pay for this great annotation tool. You can pay whatever value you like for the application including $0. Once you click on the PayPal button you will be taken to the download page.
Select the version that supports your operating system. Currently TekaPoint supports Windows and Linux.
The TekaPoint application is completely standalone and does not include an installation package. To use the
application you simply extract the downloaded compressed zip file and run the executable:
-
For Windows:
- Launch the
tekapoint.exeto run the application - Launch the
tekapoint_launcher.exeto run the launcher and then pressCTRL + `
- Launch the
- For Linux launch the
tekapoint.shscript
To delete the application you simply delete the extracted directory and compressed file. Keep in mind that TekaPoint does keep a copy of your drawings, so you may want to delete them also.
The following installation instructions cover how you can customise the way you use TekaPoint. The Windows instructions are directly below, or you can go to the Linux instructions.
Windows Installation
Once you have downloaded the TekaPoint compressed zip file, extract it to
your hard drive by following these instructions:
- Open File Explorer by pressing and holding the
Windows Key, then press the letterE. - Navigate to where you downloaded the TekaPoint
zipfile. - Right-click the
zipfile and selectExtract All... - Click the
Extractbutton to extract the TekaPoint files into a new folder.
Tip: Move the folder to its final location such as C:\ or inside your user profile folder.
Before testing TekaPoint it is worth learning at least three basic keys:
F1: Displays basic helpF2: Displays diagram helpESC: Exits the application
After you have extracted the zip file you can test TekaPoint by simply running
tekapoint.exe.

Launching TekaPoint
You have three options to launch TekaPoint during a presentation:
- Use the TekaPoint launcher program.
- Use AutoHotKey.
- Create a custom launcher.
For convenience there is a ready to use launcher program called tekapoint_launcher.exe that is
included in the zip package.
To use the launcher simply double click the tekapoint_launcher.exe file. You will notice the
TekaPoint icon will be added to your Windows desktop notification area. You can now launch TekaPoint by
pressing and holding the CTRL key and then pressing the ` (backtick) key.
This launcher program is limited and can not be customised.
AutoHotKeyIf the TekaPoint launcher above is too limited and you would like to customise the launching process, you can try AutoHotKey.
AutoHotKey is safe and free to use, so download and install it.
After installing AutoHotKey, edit the file in the extracted TekaPoint directory called
tekapoint.ahk by right-clicking on the file and selecting Open with Notepad.
You should see the following text in the AutoHotKey script file:
; Press CTRL + ` to draw
^`::
Run, tekapoint.exe
return
This AutoHotKey script file will launch TekaPoint when you press and hold the CTRL key and then
press the ` (backtick) key.
You can edit this file and change which keys are used to launch TekaPoint.
Here is an example that will launch TekaPoint using two different key combinations. One is by pressing and
holding the CTRL key and then pressing the ` (backtick) key. The other will launch
TekaPoint in a zoomed in state by pressing and holding the CTRL key and then pressing the
1 key.
; Press CTRL + ` to draw
^`::
Run, tekapoint.exe
return

; Press CTRL + 1 to zoom
^1::
Run, tekapoint.exe -z 2
return
Ensure you save the changes you made before closing your text editor.
Finally, execute the tekapoint.ahk script by double-clicking it.
You will see a green icon in the notification area
where you can interact with the AutoHotKey
instance.
You should now be able to execute TekaPoint by pressing and holding CTRL and then pressing
` (backtick).
You can also launch TekaPoint in a zoomed in mode by pressing CTRL and then pressing
1.
Feel free to edit this script and change the keys used to launch TekaPoint to your liking. If you do decide
to edit the script, right-click the green icon in
the notification area and click
Reload This Script after saving your changes. See the AutoHotKey documentation
for more detail.
The tekapoint.exe program can be executed in any number of ways. Feel free to lanch it from a
terminal, shortcut, or other desktop program.
Run TekaPoint on Windows Startup
If you want to have TekaPoint running and ready to go everytime you start Windows, follow these steps:
- Open an Explorer window by pressing the
Windowskey and then pressingE. - Browse to the location you have extracted the TekaPoint files.
- Move this Explorer window to the side.
- Hold down the
Windowskey and press theRkey to open the Run dialog window. - In the text box type
shell:startupand press Enter. - A new Windows Explorer window will open pointing at your user Startup folder.
- Right-Click the
tekapoint_launcher.exefile from the first Explorer window and drag it to the Startup Explorer window. - In the context menu that opens, select
Create shortcuts here.
You can test the shortcut by double clicking it. TekaPoint should now be in the Notification Area or System Tray.
Next time you start Windows you should see the TekaPoint icon in the Notification Area or System Tray. Test it by holding down the CTRL key and pressing the ` (backtick) key.
Linux Installation
Once you have downloaded the TekaPoint compressed zip file, extract it to
your hard drive using unzip tekapoint_linux_amd64_x_x_x.zip. Ensure you extract it to a
location you are happy to execute it from.
Test to see if TekaPoint will execute by running the tekapoint.sh script file.
tekapoint.sh script references the dependencies in the extracted directory.
If TekaPoint fails to launch, please contact me and let me know.
Once you have a working copy of TekaPoint, you will then need to configure a key combination to launch it. A
good suggestion would be holding down CTRL and pressing ` (backtick). You could
have multiple
keyboard shortcuts starting TekaPoint with different options based on the command
line arguments.
Gnome Desktop
To launch TekaPoint using a custom keyboard shortcut in the Gnome desktop environment is easy to do:
- Hit the
Superkey (Windows Key) or clickActivitiesin the top left corner. - Type
keyboardand click "Keyboard Shortcuts" under the Settings group. - Scroll to the bottom of the existing keyboard shortcuts.
- Click the
+icon at the bottom of the list. - Type "TekaPoint" into the Name text box.
- Type the path to the
tekapoint.shscript file into the Command text box. - Click the
Set Shortcut...button. - Press the new shortcut keys on the keyboard. Suggested keys: CTRL + ` (backtick)
- Click the
Addbutton.
Test launching TekaPoint by using your new keyboard shortcut keys.
XFCE Desktop
In XFCE you can create a keyboard shortcut by going to XFCE Menu > Settings > Keyboard.
Test launching TekaPoint by using your new keyboard shortcut keys.
F1- Operation helpF2- Shape and figure help
Printable help files:
The first thing you need to learn in TekaPoint is how to display the help pages. These help pages give you the basic operation of TekaPoint and the complex figure key matrix.
There are two help pages available to you once you have TekaPoint running. To view them you need to press and
hold down either F1 or F2.
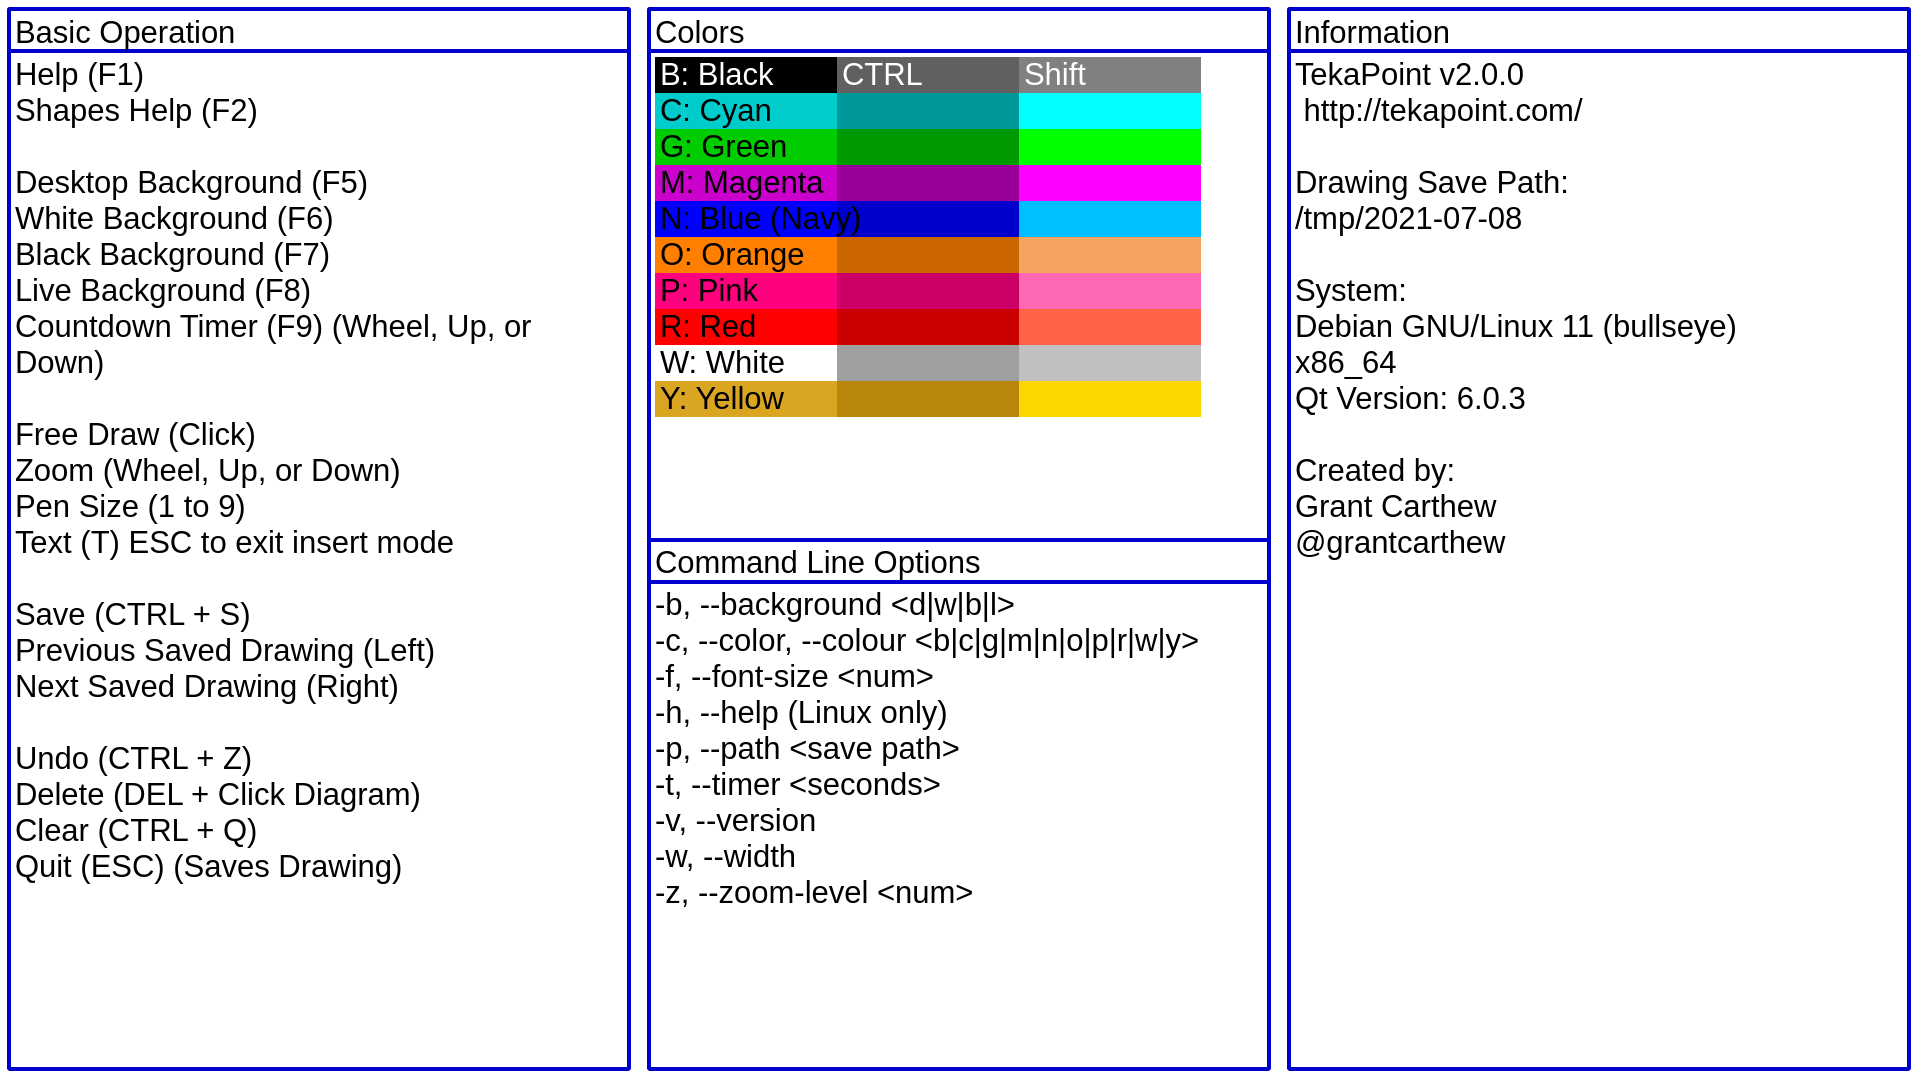
F1 Operation Help
Whilst holding F1 you will see the following page across the screen that TekaPoint is active on:
F2 Figure or Shape Help
Whilst holding F2 you will see the following figure matrix:
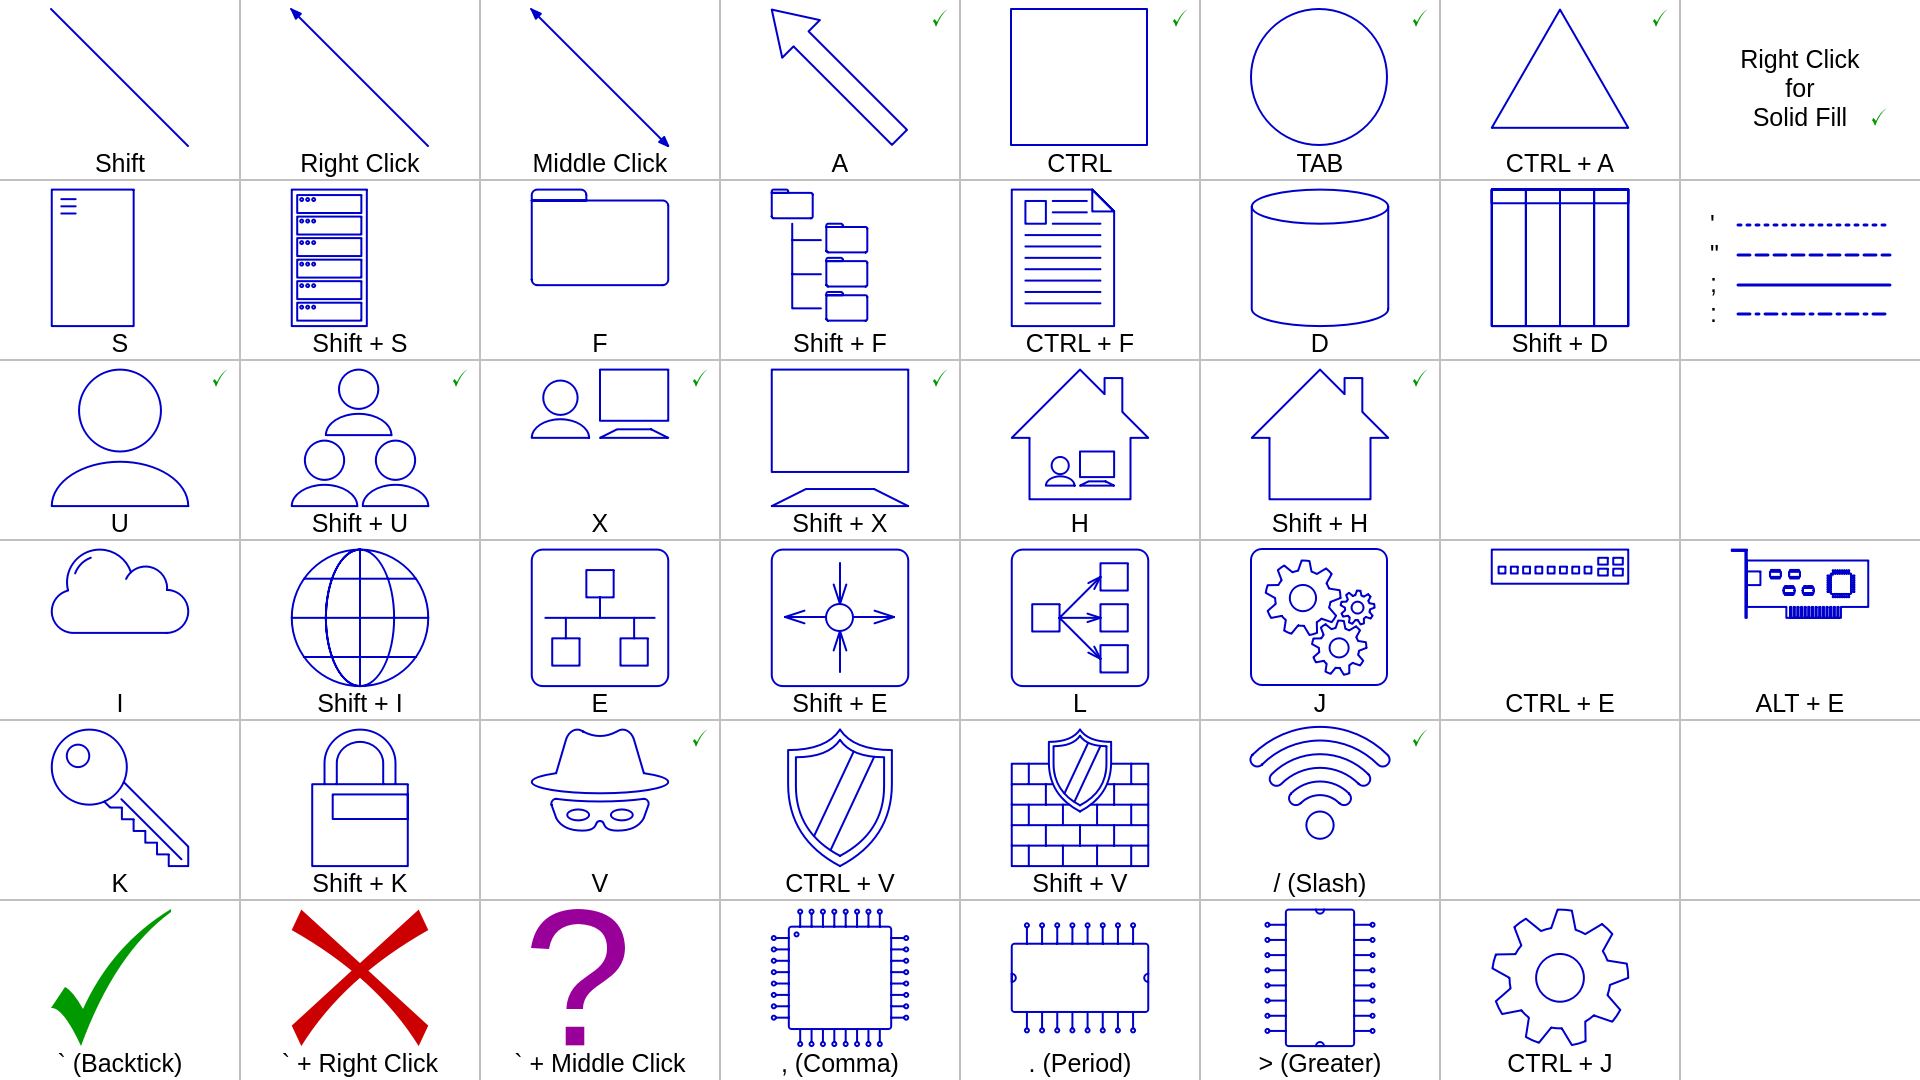
The above key matrix comes in handy if you are trying to draw a specific object and have forgotten the key
required to invoke it. Keep the F2 help handy at all times until you have practiced drawing the
diagrams you need.
TekaPoint can be launched using a Graphical User Interface (GUI) or from the command line. When launching it from the command line there are command line options available for you to customize its behavior. Note that this applies to both the keyboard shortcut commands in Linux and the AutoHotKey script in Windows.
You can obtain help about the command line options that exist using two methods:
- While TekaPoint is running, press and hold the
F1key. This will work for both Linux and Windows. - In a terminal window, type in one of the following help options. This will only work on Linux:
tekapoint.sh -htekapoint.sh --help
Following is the command line help displayed in the terminal on Linux:
TekaPoint - Desktop application for screen zooming and annotation.

Usage: ./tekapoint [options]
  -b, --background  Set a desktop, white, black, or live background.
  -c, --color, --colour  Set pen color (r).
  -f, --font-size  Set font size (10).
  -h, --help Display this information.
  -p, --path  Set the save path for image files.
  -t, --timer  Set the countdown timer in seconds.
  -v, --version Display the application version.
  -w, --width  Set pen width (2).
  -z, --zoom-level  Set zoom level (1).

Operation:
  F1 to show basic help and information.
  F2 to show available diagrams.
  F5 to set the background to a desktop image.
  F6 to set the background to white.
  F7 to set the background to black.
  F8 to set the background to live.
  F9 to display a countdown timer (wheel, up, or down to adjust).
  Mouse Left Click to free draw.
  Mouse Wheel, Up, or Down to zoom in and out.
  1 to 9 to set the pen width.
  B,C,G,M,N,O,P,R,W,Y to set the pen color.
  T to type text with Mouse Wheel to change font size.
  Left to load previous saved drawing.
  Right to load next saved drawing.
  CTRL + Q to clear
  CTRL + S to save image.
  CTRL + Z to undo.
  Delete + Mouse Left Click to delete.
  ESC to quit.

Primary Tools:
  Free Draw: Left Click
  Line: Shift
  Arrow Line: CTRL + Shift or Right Click
  Arrow Line Double Headed: Middle Click
  Ellipse: TAB
  Rectangle: CTRL

Colors:
  Black (B)
  Blue (N)
  BlueDark (CTRL + N)
  BlueLight (Shift + N)
  Cyan (C)
  CyanDark (CTRL + C)
  CyanLight (Shift + C)
  GrayDarkest (CTRL + B)
  GrayDark (Shift + B)
  GrayLight (CTRL + W)
  GrayLightest (Shift + W)
  Green (G)
  GreenDark (CTRL + G)
  GreenLight (Shift + G)
  Magenta (M)
  MagentaDark (CTRL + M)
  MagentaLight (Shift + M)
  Orange (O)
  OrangeDark (CTRL + O)
  OrangeLight (Shift + O)
  Pink (P)
  PinkDark (CTRL + P)
  PinkLight (Shift + P)
  Red (R)
  RedDark (CTRL + R)
  RedLight (Shift + R)
  White (W)
  Yellow (Y)
  YellowDark (CTRL + Y)
  YellowLight (Shift + Y)

Diagrams:
  Arrow: A
  Arrow Filled: A + Right Click
  Arrow Line: CTRL + Shift or Right Click
  Arrow Line Double Headed: Middle Click
  Chip DIP: . (Period)
  Chip DIP Vertical: > (Greater)
  Chip QFP: , (Comma)
  Cloud (Internet): I
  Cog: CTRL + J
  Cross: ` (backtick) + Right Click
  Database: D
  Document: CTRL + F
  Ellipse: Tab
  Ellipse Filled: Tab + Right Click
  Ethernet: E
  Ethernet Device: CTRL + E
  Firewall: Shift + V
  Folder: F
  Folder Tree: Shift + F
  Globe: Shift + I
  Home with User: H
  Home: Shift + H
  Home Filled: Shift + H + Right Click
  Key: K
  Line: Shift
  Load Balancer: L
  Lock: Shift + K
  NIC: ALT + E
  Question Mark: ` (backtick) + Middle Click
  Rack: Shift + S
  Router: Shift + E
  Rectangle: CTRL
  Rectangle Filled: CTRL + Right Click
  Server: S
  Service: J
  Shield: CTRL + V
  Table: Shift + D
  Threat Actor: V
  Threat Actor Filled: V + Right Click
  Tick: ` (backtick)
  Triangle: CTRL + A
  Triangle Filled: CTRL + A + Right Click
  User: U
  User Filled: U + Right Click
  User Group: Shift + U
  User Group Filled: Shift + U + Right Click
  Workstation: Shift + X
  Workstation Filled: Shift + X + Right Click
  Workstation with User: X
  Workstation with User Filled: X + Right Click
Command Line Examples
The following example will launch TekaPoint with the desktop zoom level set to 3:
$ tekapoint -z 3
The following example will launch TekaPoint with the background set to live:
$ tekapoint --background live
The following example will launch TekaPoint with the smallest pen width or size:
$ tekapoint -w 1
This final example will launch TekaPoint with the largest pen width, a white background, and an orange pen color:
$ tekapoint -w 9 -b white -c o
Once you have installed TekaPoint, you will be ready to enhance your presentations. Following is the general operation of TekaPoint.
TekaPoint is not a persistent program. When you launch it with your keyboard shortcut (or by other means)
the application is started. When you hit ESC the application is terminated. There is no
background process running once you have exited the application.
On a multi-display system with either a few monitors or a projector and monitor, TekaPoint will become active only on the display the mouse was on when the application was launched. If you move the mouse off the active drawing monitor onto a second display, it will operate as a normal mouse pointer. Bringing the mouse back onto the original monitor will return it to being a drawing mouse.
After launching TekaPoint, the keyboard becomes a mass of control switches to change the TekaPoint drawing mode.
To start with you will be in a free draw mode. By left-clicking on the mouse you can draw red free-form lines.
At this point you have the option of changing what is drawn with the mouse by holding down keys on the
keyboard.
As an example, if you hold down the letter X, left-click the mouse, and drag the mouse you will
see a user and a monitor figure appear. Let go of the left mouse button and the figure is committed.
Here is a list of the drawing modes and other operations available and documented below:
- Changing the drawing background
- Changing the pen size and color
- Drawing lines and arrows
- Drawing complex figures and diagrams
- Zooming into and out of the desktop
- Typing text onto the screen and changing its size
- Undo, delete, and clear drawings
- Saving drawings and moving through previous drawings
- Displaying a break or countdown timer
The best way to use TekaPoint is to start and stop the application many, many times during a presentation.
Imagine you are showing a group of people a website. While the website is on the screen, launch TekaPoint and
grab everyone's attention by drawing an ellipse around an area of the page. Or right-click and draw an arrow
pointing to something of interest. Then hit ESC and move onto the next web page.
Another great use for TekaPoint is to use the complex figures to help explain a concept or to answer questions about your presentation.
Your ability to amaze your observers greatly depends on your TekaPoint keyboard knowledge. Practise all the different drawing modes and figures and try all the different colors. Keep practising prior to each presentation and you will be a wizard at getting information across.
F5- Desktop backgroundF6- White backgroundF7- Black backgroundF8- Live desktop background
TekaPoint supports four different background modes being: desktop, white, black, and live.
Press the F5 key once to switch the background mode to static desktop. This will display a
drawing background that is a snapshot of the desktop taken the moment TekaPoint was launched. This is the
default background mode, so you may not notice any difference until you try another background mode.
Press the F6 key once to switch the background mode to a white screen. This is ideal for breaking
out of the current presentation to draw a custom diagram.
Press the F7 key once to switch the background mode to a black screen. This mode is used less
often however it may be the right option for your circumstance.
Press the F8 key once to switch the background mode to a live, moving desktop. Anything that was
moving or is moving on the desktop will be seen whilst you are drawing. Tip: If you find the static
desktop mode (F5) fails to work on your system, try the live background mode. You can also set
this background mode from a command line option.
You can switch between the different backgrounds without any of your active drawings being affected.
1 - 9- Set the pen sizeB, N, C, G, M, O, P, R, W, Y- Change the pen color
When you see the term pen in the TekaPoint documentation it is referencing the drawing point under the mouse.
By default the pen in TekaPoint will have a size or width of 2 and a color of red. This is what you will draw with when you first launch TekaPoint without any command line arguments.
You can change the pen size by pressing a number from 1 to 9. There is no need to
hold the number key down.
Here is an example of drawing a double-headed arrow with the different pen sizes:

The following table shows the keys you can use to change the pen color:
| Key | Color | Name |
|---|---|---|
| B | Black | |
| CTRL + B | Darkest Gray | |
| Shift + B | Dark Gray | |
| N | Blue | |
| CTRL + N | Dark Blue | |
| Shift + N | Light Blue | |
| C | Cyan | |
| CTRL + C | Dark Cyan | |
| Shift + C | Light Cyan | |
| G | Green | |
| CTRL + G | Dark Green | |
| Shift + G | Light Green | |
| M | Magneta | |
| CTRL + M | Dark Magneta | |
| Shift + M | Light Magneta | |
| O | Orange | |
| CTRL + O | Dark Orange | |
| Shift + O | Light Orange | |
| P | Pink | |
| CTRL + P | Dark Pink | |
| Shift + P | Light Pink | |
| R | Red | |
| CTRL + R | Dark Red | |
| Shift + R | Light Red | |
| W | White | |
| CTRL + W | Light Gray | |
| Shift + W | Lightest Gray | |
| Y | Yellow | |
| CTRL + Y | Dark Yellow | |
| Shift + Y | Light Yellow |
Left Click- Free drawShift + Left Click- Straight lineRight Click- Arrow lineMiddle Click- Double headed arrow line
One of the most commonly used features of TekaPoint is highlighting content by drawing lines.
You can freely draw on the screen by simply clicking the left mouse button and moving the mouse. This type of drawing is useful for showing connections between diagrams or circling screen content.

Holding the Shift key whilst also left-clicking and moving the mouse will draw a straight line
anchored to where you first clicked the mouse.

You will notice when drawing lines that the line will snap to both the vertical and horizontal planes if you are close to that area.
You can draw an arrow line by using one of two methods: either right-click and move the mouse or hold down
CTRL and Shift before left-clicking and moving the mouse.
Extending the arrow line above, you can draw a double-headed arrow line by middle-clicking and moving the mouse. A middle-click is made by pushing the mouse wheel down until you hear a click.
Finally, you can change the line style from the default solid style to dotted, dashed, or dash dot style.
'(apostrophe): Dotted"(quotes): Dashed:(colon): Dash Dot;(semicolon): Solid

CTRL + Left Click- Draw rectangleTAB + Left Click- Draw ellipseA + Left Click- Draw large arrowSee F2 Help- Draw complex shapes and figures
Checkout the Matrix page for a drawing cheat sheet.
Now we get into the fun stuff. TekaPoint can draw simple shapes like rectangles and ellipses, or complex figures like a user at home or a lock and key.
Let's start off easy with a rectangle. Simply hold down CTRL and left-click the mouse. A
rectangle will be drawn on the screen whilst you are holding the mouse button. Drag the mouse to change the
size of the rectangle. When you let go of the left mouse button, the rectangle will be committed to the
diagram.

Drawing an ellipse is exactly the same except you hold down the TAB key.

If you have read the drawing lines topic, you will know about drawing arrow lines
using right-click or middle-click with the mouse. You can also draw a large arrow by holding the
A
key down whilst drawing.

There are many more complex figures you can draw once you have mastered the basics. Hold down F2
to see the full list of shapes and figures you can draw. Here are just a few for example:

There are three special figures that work differently to all the rest. They are the tick, cross, and question mark. When you draw either one of these, the color is fixed. A tick will always be green, a cross will always be red, and a question mark will always be dark magenta or purple.

Lastly, some of the shapes and figures support what is called "solid fill". When you are holding
F2 and you can see the help for drawing figures, you will notice a small green tick on some of
the
items. This indicates that the figure supports solid fill. To use solid fill, hold down the required key and
right-click the mouse rather than left-click. This can be handy for some diagrams. Here is an example of
some of the figures with solid fill. Tip: Use a white solid fill rectangle to hide or "delete" content
from the captured desktop or slides.

Mouse Wheel- Zoom in and outUp and Down Arrow- Zoom in and out
Whilst showing content to an audience, zooming in on the relevant area of the screen can be an extremely effective tool to keep everyone's attention. Another great use of zooming is to increase the size of the content so the audience can actually see or read it.
To zoom in and out, simply use the mouse wheel or press the up and down arrows on the keyboard.
Zoomed content has two modes: fixed or movable. By default you will be in a movable mode. If you move the mouse around, the focus of the zoomed content will change allowing you to move to other areas of the desktop.
By clicking any mouse button or pressing any key on the keyboard (except ESC) the zoomed mode
will change from movable to fixed. Once in fixed mode you can draw as you normally would. The visible area of
the desktop will not move. Tip: The pen size will be zoomed so consider changing the pen size if you need
to.
To exit fixed mode you will need to zoom in or out using the mouse wheel.
T- Enter typing modeLeft Click- Place cursor for typingESC- Exit typing mode
Adding labels to drawings or expanding content with notes is an invaluable feature of TekaPoint. At any time you can switch TekaPoint from drawing mode into text mode and type content onto the screen.
Before changing into text mode, consider the color you would like your text to be. You can not change the color once you enter text mode.
To enter text mode press the T key. You will see the mouse cursor change into an L shape. You
will not be able to type on the screen until you left click with the mouse where you would like to start
typing. Note: Only simple text editing features exist in this mode such as backspace.
While you are in text mode you can change the font size with the mouse wheel. You can also move the text you have typed to any location on the screen by left clicking the mouse again.
When you have finished typing the content you need, exit text mode by pressing the ESC key once.
Don't forget that the ESC key is also used to exit TekaPoint, so be careful not to exit the whole
drawing. Tip: If you do exit by mistake, start TekaPoint again and hit the left arrow on the
keyboard.
The text size and location will be remembered whilst you have TekaPoint running. Once you exit TekaPoint these settings will be returned to either the default values or the values set by the command line.
CTRL + Z- UndoDelete + Left Click- Delete item under the mouse pointerCTRL + Q- Clear the screen
Everyone makes mistakes. Here is how you can undo your mistakes when drawing with TekaPoint.
To undo the last change you made to the desktop image you can press and hold the CTRL key and
then press the Z key.
If you wish to remove a previous addition you made to your diagram without undoing the most recent changes,
you can hold down the Delete key. Whilst you are holding the delete key there will be grey hit-boxes
displayed around your figures. Click inside one of these hit-boxes to remove the drawn item. Note that this
delete process will remove the items under the mouse in reverse order of their
addition.
Finally, you can completely remove all shapes, figures, and text by clearing the screen. To do this hold down
the CTRL key and press the Q key.
CTRL + S- Save the current drawingESC- Exiting TekaPoint always saves the drawingLeft Arrow- Move back through saved drawingsRight Arrow- Move forward through saved drawingsF1- See the save path in the operation help
You can save time by opening a previous diagram rather than drawing it from scratch. Also, it is common for people watching your presentation to ask a question about a previous diagram. TekaPoint has your back here by allowing you to return to previous diagrams. You can also view previous diagrams outside of TekaPoint.
For TekaPoint to open previous diagrams it needs to save them onto your local disk. If you don't specify a
save location with the -p or --path command line option, TekaPoint
will use the users TEMP location. This location is typically in the users profile on Windows or
in the /tmp path on Linux. Tip: You can find the save location on the F1 help
screen
To prevent too many files being placed into the save location, TekaPoint creates a new directory for each day
in the format of yyyy-mm-dd. If you open the save location you will see many directories
depending on how often you use TekaPoint. If you look inside each of these directories you will see a snapshot
of your diagrams when they where saved.
If you want to save a diagram at a specific point before you continue drawing, press and hold the
CTRL key and then press the S key. You can continue drawing at this point knowing
your current desktop state has been saved into a .png file.
TekaPoint also saves the desktop state into the save location every time time you exit the application. If you
launch TekaPoint, draw one line, then exit, your current desktop image will be saved in a .png
file.
To view previous diagrams from the same day, simply launch TekaPoint and hit the left arrow key. After you have gone back to old diagrams, you can move forward by hitting the right arrow key.
If you want to show a diagram you drew in the past, open your operating systems file explorer and
navigate the save location. Open the .png file with any supported viewing application. You can
continue to draw on the diagram once it is visible by launching TekaPoint again. This will also save the
diagram into the current days images.
WARNING
Do not use TekaPoint when sensitive information is on your screen. When you exit the application it will save your sensitive information into the save location. If you do this by accident, make sure you go into the save location and delete the image.
TekaPoint never deletes these image files so be careful.
F9- Start the countdown timerMouse Wheel- Change the value of the countdown timerUp and Down Arrows- Change the value of the countdown timerESC- Exit the countdown timer
During a presentation it can be handy to time the breaks so people know when you are resuming. TekaPoint has a simple countdown timer function to help you with this.
To start the countdown timer, press the F9 key. Use the mouse wheel or the up and down arrow keys
to adjust the time by one minute intervals.
Once the countdown timer hits 0:00 it will stop counting down.
Press the ESC key to exit the countdown timer. If you had drawn anything before starting the
countdown timer, you will be returned to the diagram. If not then TekaPoint will exit.

The TekaPoint software package was created by me, Grant Carthew, around the middle of 2019. I use Linux on my laptop and could not find a quality screen annotation software package to help me deliver classes.
Through to the end of 2019 and during the beginning of 2020, TekaPoint worked well drawing lines and other simple shapes on the screen.
I had to work from home during the 2020 / 2021 SARS-CoV-2 coronavirus pandemic. Without a whiteboard to draw diagrams for my classes, I switched to using a tablet device. This worked, however the diagrams were extremely poor quality. Also, switching over to using a tablet in the middle of a subject interrupted the flow of information. These compromises seemed to be the cost of the pandemic.
It wasn't until one of my children ran off with my drawing tablet that I found myself having to draw a diagram using just the mouse. This is what caused the lightbulb moment. Whilst drawing a user sitting in-front of a desktop computer, I thought, "I draw this shape all the time. Why draw the same shape over and over when I could build it into TekaPoint?"
This exploded TekaPoint into the program you see today. I no longer have a need for a drawing tablet. I use TekaPoint for all my diagram work from pointing at content on slides or web pages, to switching to a white screen and creating a complex architecture diagram.
I honestly hope you have as much fun as I do using this tool. Every time I launch TekaPoint I am excited to see the result.
TekaPoint is built on top of the Qt Framework v6.0.3 using the QtWidgets.
It is written using the C++ programming language.
- 2021-06-28: Major Release v2.0.0
- Upgraded to Qt Framework v6.0.2
- Added dot, dash, solid, and dash dot line styles.
- Added mouse pointer outline.
- Added delete hit box to aid deleting.
- Added Qt version and tekapoint.com to F1 help screen.
- Added exe icon (Windows).
- Improved countdown timer style and function.
- Inverted mouse wheel operation for font size and countdown timer value.
- Enabled antialiasing for drawings.
- Enabled smooth transform for zoom levels < 7.
- Fixed gap in F1 help color table.
- 2020-10-20: Feature Release v1.2.0
- Added question mark assigned to
`with mouse middle click. - Added double headed line arrow assigned to middle click.
- Updated tick shape and color.
- Updated cross shape and color.
- Updated font size on help drawings. Now using dynamic sizing.
- Updated undo help text to include
CTRL + Z.
- Added question mark assigned to
- 2020-08-25: Feature Release and Fixes v1.1.0
- Updated Save Function:
- Enabled by default into a temp directory if not specified.
- Creates sub-directories based on the date (2020-08-25).
- Added loading saved drawings assigned to Left and Right.
- Added
Countdown Timerfunction assigned toF9. - Added Up and Down key to adjust zoom or countdown timer duration.
- Added
-t, –timer secondscommand line option. - Added command line help to
F1help screen. - Improved help details including
ESCfunction. - Smoothed diagram scaling.
- Fixed Windows Live View not working as expected.
- Fixed launching of multiple processes.
- Updated Save Function:
- 2020-08-10: Initial Release v1.0.0